Forum Replies Created
-
AuthorPosts
-
July 6, 2026 at 1:36 pm in reply to: Anyone using WP Swings’ “Gifting Portal” for offline/POS gift card. #5049
 ChristopherParticipant
You can sell and manage gift cards directly in WooCommerce, with a bunch of customization and some solid offline features.
How it works for mixed online + offline stores
Online:- You create gift card products in WooCommerce (fixed amount, range, custom amount, etc.).
- Customers buy them on your site, choose delivery (email, WhatsApp/SMS, PDF download, or physical shipping), and the buyer/receiver gets a unique code + optional QR/barcode.
- They can also check balance and recharge/top‑up from their “My Gift Cards” area in their account.
Offline / brick‑and‑mortar:
- You get a dedicated Gifting Portal (a web URL you can open on any laptop/tablet in the store, or embed in your POS via iframe)
At the counter, staff: ( Note – The free version restricts you to a maximum of 2 employees. )
– Open the portal and log in with their employee account
– Scan the QR/barcode on the customer’s phone/printout (or enter the code manually)
– Instantly see the gift card details and balance
– Click Redeem to apply it to the current bill, or Recharge to add more balance.The portal tracks everything by store and by employee, so you know which location/staff redeemed or topped up each card.
You don’t need special hardware; a normal laptop or tablet with a camera (or a cheap USB scanner) is enough for the camera-based QR/barcode scanner.
- Create one or more Gift Card products and set pricing type
- Set up the Gifting Portal:
- Add your physical store locations
- Create employee accounts with logins
- Share the portal link (or embed URL) with your POS/store devices
Train staff to:
- Open portal → log in → scan/fetch → redeem or recharge → confirm.
May 26, 2026 at 11:41 am in reply to: What happens if my WordPress website gets hacked or breaks after launching? #4977ChristopherParticipantIf a WordPress site gets hacked or breaks after launch, the real question is less “if” and more “how fast can it be fixed without losing traffic, leads, or sanity?”
A good developer or WooCommerce Developement agency should already have a post-launch safety net in place.
Usually that includes:
- Daily or real-time backups
- Malware scanning & firewall protection
- Plugin/theme update monitoring
- Staging environment for testing changes before pushing live
- Uptime monitoring (so issues are caught fast)
- Emergency rollback options
- SSL/security hardening
- Limited admin access & 2FA
If something breaks after an update or hack attempt, the normal protocol is:
- Put the site in maintenance mode (if needed)
- Identify whether it’s a plugin conflict, server issue, or security breach
- Restore the latest clean backup
- Remove malicious files/users if hacked
- Patch vulnerabilities + update passwords/API keys
- Test forms, checkout, SEO pages, and integrations
- Monitor logs afterward to prevent repeat attacks
A lot of site owners learn this the hard way after installing 37 random plugins from YouTube tutorials.
ChristopherParticipantIf you are using Bigin by Zoho CRM to manage your small business, manually moving customer data from your online store is a major bottleneck. The Integration for Bigin by Zoho CRM by WP Swings solves this by creating a seamless bridge between your WordPress site and your CRM.
Key Benefits for Your Business:
1. Real-Time Data Sync: Automatically sync customers, products, and orders as “Contacts,” “Products,” and “Deals” in Bigin.
2. Pipeline Management: Instantly turn new store orders into deal stages, allowing you to track your sales funnel without lifting a finger.
3. Map Custom Fields: Ensure every piece of unique data you collect on your site lands in the right spot within Bigin.
4. Log Management: Keep a clear record of all data transfers to ensure your synchronization is always running smoothly.
By automating the flow of information, you can stop worrying about data entry and start focusing on closing more deals.
Pro-Tip: Small businesses that use CRM integrations often see a significant boost in customer response times – one of the top customer service tips for driving long-term loyalty.
ChristopherParticipantFrom what I’ve seen across ecommerce accounts both work, but they hit differently depending on timing and intent.
Quick breakdown:
Upselling usually wins when:
– The core product already solves the main pain
– The upgrade clearly removes friction or unlocks a “power” feature
– Users have already touched value (trial, usage, first success moment)Best performing spots:
– Inside the app after activation
– Usage-limit walls (“you’re close to your cap”)
– Post-trial downgrade screens
– Plan comparison pagesCross-selling usually wins when:
– The add-on is tightly connected to the main job-to-be-done
– It saves time or reduces setup effort
– It feels like a bundle, not a random extraBest performing spots:
– Cart + checkout (but keep it light)
– Post-purchase one-click offers
– Lifecycle emails after first purchase
– “People also use” inside dashboardsWhat actually drives more revenue?
Short term → cross-sell often lifts AOV faster.
Long term → upsell usually drives more LTV.Cross-sells are snackable. Upsells are compounding.
 ChristopherParticipant
Table rate shipping is a method that uses rules to set shipping fees for WooCommerce. These fees depend on specific conditions, not just one flat rate.
You make shipping rules in a table. When a customer orders, the system checks the table. It then calculates the correct shipping rate.
How Table Rate Shipping Works:-
Rule-based shipping works by matching order details with your shipping rules. These rules can be based on:– Product weight
– Number of items in the cart
– Shipping zones or specific countries
– Shipping classes
– Cart value (to offer free shipping)
– Optional handling fee
– Once the rules are set up, the system automatically calculates shipping rates at checkout.Example of Table Rate Shipping:-
Here’s a simple example to understand in real life:
1–2 items → ₹50 shipping
3–5 items → ₹100 shipping
Heavy products → higher shipping fee
Orders above ₹5,000 → free shipping
The customer sees the correct shipping cost without confusion.Table Rate Shipping vs Flat Rate Shipping:-
– Flat rate shipping: One fixed shipping fee for every order
– Table rate shipping method: Shipping rates based on rules like weight, items, or locationFlat rate is easy to set. Table rate shipping is more accurate and fair.
Table Rate Shipping in WooCommerce:-
WooCommerce doesn’t support this by default. Store owners usually use a WooCommerce table rate shipping plugin to:– Add shipping method with rule-based logic
– Set shipping rates based on product weight or number of items
– Create multiple shipping options
– Apply shipping rules for shipping zones or specific countries
– Upload shipping rules using a CSV fileThis makes it easy to set up shipping without manual calculations.
Why it Makes Sense
If you’ve ever wondered what is table rate shipping and why brands use it, the answer is simple: control and clarity.– Fair shipping fees for customers
– Better margin control
– Scales well as products and locations grow
– No guesswork at checkoutFinal Take
So, what is table rate shipping?It’s a smart, rule-based way to calculate shipping fees based on real order conditions, not assumptions.
January 5, 2026 at 12:38 pm in reply to: Looking for affordable sales funnel solutions compatible with WordPress. #4617ChristopherParticipantIf you’re looking for an affordable, WordPress-focused sales funnel solution, Upsell Funnel Builder for WooCommerce by WP Swings stands out as the hero choice.
It offers powerful upsells, cross-sells, and order bumps, even in the free version, making it perfect for stores that want to increase AOV without extra complexity or cost.
1. Upsell Funnel Builder (WP Swings) – Best overall budget-friendly hero plugin for WooCommerce funnels and checkout-stage upsells.
2. CartFlows – Great for improving checkout flow, especially for beginners.
3. FunnelKit – Ideal for advanced users who need full marketing automation and deep funnel analytics.
4. OptimizePress – Best for visually rich landing pages and sales funnels.
5. SeedProd – Simple and fast landing page + funnel builder for WooCommerce.
Quick take:
Start with Upsell Funnel Builder by WP Swings for maximum value at minimal cost.ChristopherParticipant- Give customers a self-serve path:
When folks can start a refund or exchange on their own, the confusion drops instantly.
A plugin like RMA Return Refund & Exchange for WooCommerce Pro lets them request returns, exchanges, or even cancellations right from their My Account page, no email ping-pong. - Automate the boring stuff:
Once you approve a return, the plugin can auto-restock inventory, so you’re not cleaning up stock levels at midnight like an unpaid elf.
Plus: automated status updates via email or WhatsApp = fewer “any updates???” messages. - Give customers visibility:
Holiday shoppers just want to know what’s happening.
Real-time notifications keep them in the loop and keep your inbox from exploding. - Keep your own workflow clean:
Centralized RMA tracking means everything, refunds, exchanges, replacements, lands in one dashboard, not scattered across random emails and sticky notes.
Again, this is exactly what the WP Swings RMA plugin handles for you
October 10, 2025 at 6:17 am in reply to: How can administrators configure the order cancellation in RMA Plugin. #4422ChristopherParticipantIf you’re using the RMA Return Refund & Exchange for WooCommerce Pro plugin by WP Swings, here’s a quick breakdown of how to set up and customize the order cancellation feature.
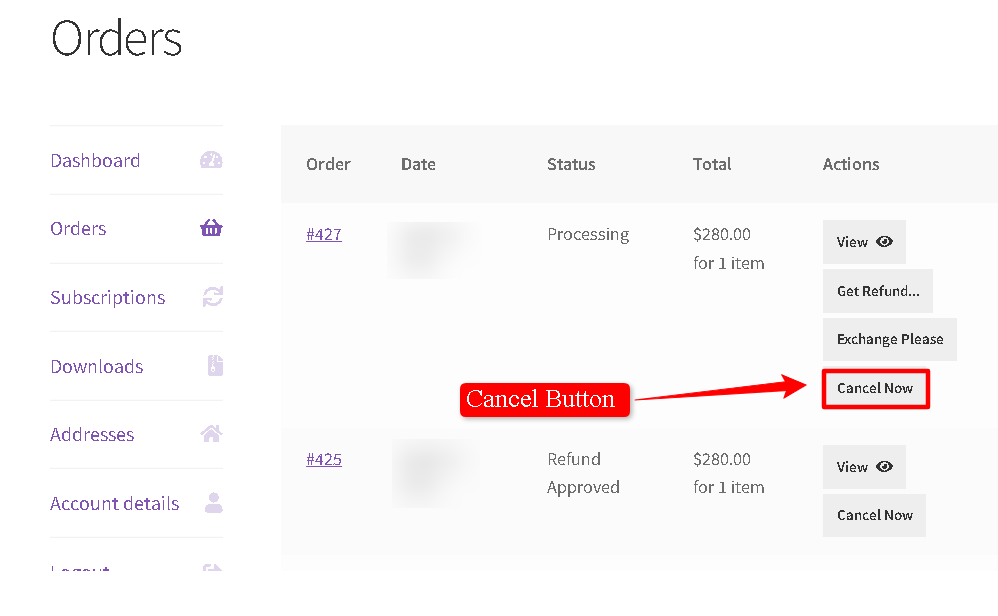
- Turn it on: Go to WPSwings → RMA Settings → General Settings and enable Cancel (Premium)
- Partial cancellation: In the Cancel Tab, toggle Cancel Order’s Product so customers can cancel specific items instead of the full order.
- Hide/Customize buttons: You can hide the Cancel button for COD orders or on certain pages, and even change its text under Appearance in the Cancel Tab.
- Set restrictions: In the RMA Policies Tab, create rules like a minimum order amount or block cancellations for certain order statuses.
Basically, once you tweak these few settings, the cancellation process becomes way smoother — no more manual “please cancel my order” emails.
You can refer to the full guide here.
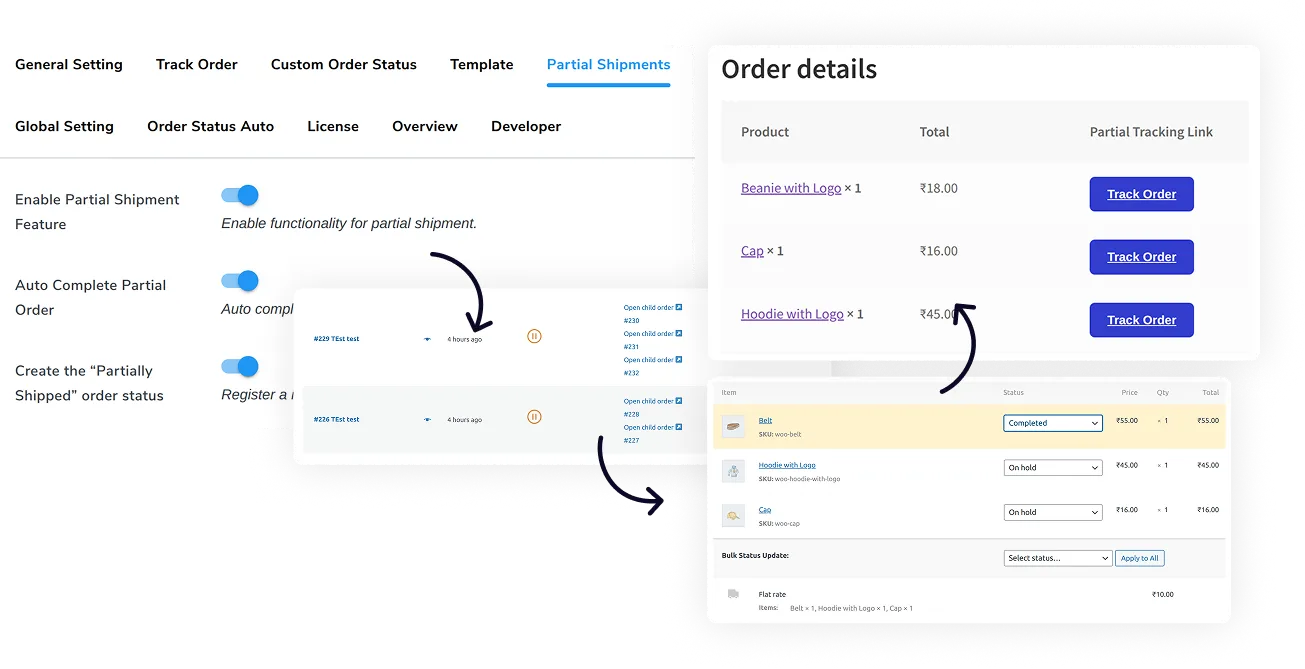
October 3, 2025 at 1:01 pm in reply to: How do you guys handle shipments during the holiday season rush? #4395ChristopherParticipantLast Holiday Season, we had the same pain,
We started using the Track Orders plugin, which introduced a WooCommerce Partial Shipment Tracking feature for WooCommerce, and honestly, it saved us this season.
Customers now see separate tracking buttons for each shipment, and I can mark the order as “partially shipped” instead of messing around with multiple manual updates.
Once the full order is complete, the system automatically completes everything.
 September 15, 2025 at 5:27 am in reply to: How to sync between WooCommerce and QuickBooks without causing duplicates. #4332ChristopherParticipant
Hey! I’ve been working on syncing SKUs between WooCommerce and QuickBooks, and here’s what helped me avoid duplicates and errors:
- Use unique SKUs – Clean up your product list before syncing to prevent duplicates.
- Map carefully – Make sure products match correctly between platforms.
- Test first – Sync a few products at a time before doing everything at once.
- Check updates – Verify how edits like price changes sync.
- Watch error logs – Look for issues after syncing and fix them early.
- Set rules – Enable duplicate prevention if your plugin offers it.
- Backup – Always back up before syncing!
August 20, 2025 at 11:45 am in reply to: How do I create and use custom order statuses in WooCommerce? #4265ChristopherParticipantYep! You can totally add Custom Order Statuses if you’re using a tracking plugin (like the WP Swings one). It lets you create your own statuses that fit your exact fulfillment process.
Here’s how you can do it:
- Go to your plugin dashboard and hit the “Create Order Status” button.
- Give your new status a name (e.g., “Awaiting Approval”) and add a default image/icon for it.
- Pick the template you want to display for that status.
- Click Save Settings. ✅
- Now to actually use your custom statuses:
- Open the Custom Order Statuses dropdown.
- Search or scroll to pick the one you just created.
- Hit Save Settings again, and boom, it’s live.
This way, you can split the whole delivery process into mini-stages that make way more sense than the boring defaults.
Super useful if you want your customers to know exactly where their order is at any given time. 🚚✨
ChristopherParticipantYes, there is a better way to handle refunds without letting your revenue slip away.
We’ve been using the RMA Return Refund & Exchange for WooCommerce plugin by WP Swings, and it’s been a game-changer , especially because of its Wallet Refund feature.
Rather than refunding the amount to a customer’s bank or card, this RMA plugin allows you to offer it as store credit straight into their WooCommerce wallet. That way, the money stays within your store — and it gives your customers a reason to come back and shop again.
Here’s what makes it worth trying:
- Customers are way more likely to return and use their wallet balance
- You retain the refunded amount within your store
- It’s easy to manage from the backend, no complicated setup
- The wallet shows up as a payment option during checkout
We implemented this for a client store, and honestly, we saw a solid bump in repeat orders after returns. It’s a subtle but powerful way to turn refunds into second chances.
Here’s the documentation if you want to explore it:
🔗 Wallet Feature – WP Swings RMA Plugin
Read Full Article-
This reply was modified 11 months, 1 week ago by
Samael.
July 21, 2025 at 12:29 pm in reply to: How do you track SKU-level profitability in WooCommerce? #4150ChristopherParticipantThe default WooCommerce setup makes it hard to trace these back to individual SKUs, especially when only one product in a multi-item order gets refunded or exchanged.
Most analytics plugins show sales, but not true profit after returns, and Most WooCommerce store owners are laser-focused on:
– Revenue growth
– Order volume
– Conversion rateYour most “profitable” SKU might be losing you money—if refunds and returns aren’t tracked accurately.
Here’s how you can get closer to accurate SKU-level profitability tracking using the RMA for WooCommerce Plugin Pro, and RMA for WooCommerce Free Version, as mentioned in the Documentation
✅ Step 1: Install and Activate the Plugin
📦 Step 2: Enable Return and Refund Settings
🗂️ Step 3: Use the RMA Report
Here, you’ll see a complete list of return/refund/exchange requests with:- Order ID
- SKU/Product Name
- Request Type (Refund, Exchange, Cancel)
- Request Status (Approved, Pending, Solved, Declined)
- Order Status
- Request Date
- Refund Reason
📊 Step 4: Analyze the Data
Filter or sort reports by SKU to check which products are being returned/refunded the most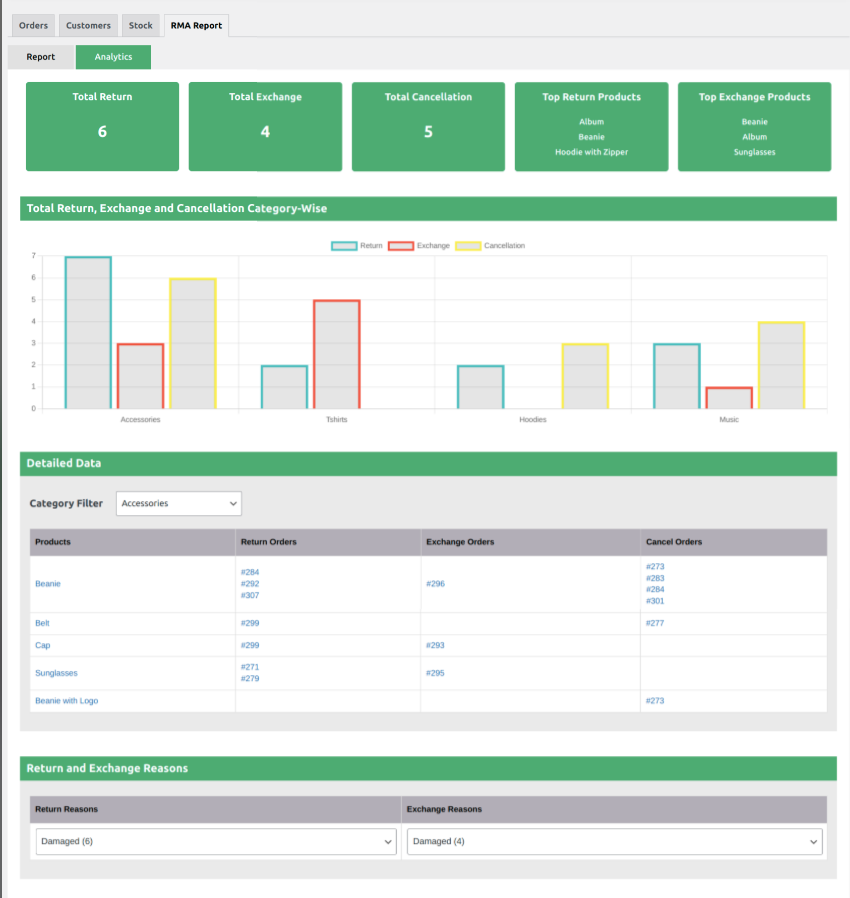 July 7, 2025 at 12:40 pm in reply to: How do I restrict refund/exchange requests based on user roles? #4117ChristopherParticipant
Currently, the RMA Return Refund & Exchange for WooCommerce plugin supports only the default WordPress and WooCommerce user roles (like Administrator, Editor, Customer, etc.) for restricting access to return, refund, and exchange functionalities.
If you’ve created any custom user roles, additional development is required to extend this functionality. This means the ability to block or restrict custom roles from RMA actions would need to be custom-coded. The good news is that the WP Swings development team can help you implement this as per your requirements.
Also, please note that you cannot restrict specific users under the default Customer role using the plugin settings alone. This level of control blocking RMA access for individual customers also requires custom development.
For both these use cases, we recommend reaching out directly to the WP Swings development team to discuss a tailored solution.
ChristopherParticipantIf you want to hide those related products in WooCommerce without messing with a plugin, you can either tweak your theme’s template files or throw in some custom CSS.
OR if you’re looking for a more permanent fix, you can just get rid of the related products section by adding a little code to your theme’s functions.php file or by unhooking the WooCommerce action that shows them.
Alternatively, you can hide them using CSS, though this only visually hides them, and the related products data is still loaded in the background.
Here’s a breakdown of the methods:
1. Theme Customizations:
- Locate the template:
Identify the template file in your theme that displays related products (usually woocommerce/single-product/related.php). - Remove or modify:
You can either remove the entire related products section from the template or modify the code to exclude certain products or categories.
2. Using Custom CSS:
- Access the customizer: Go to Appearance > Customize > Additional CSS in your WordPress dashboard.
- Add the CSS: Use the following CSS code to hide the related products section:.related.products {
display: none !important;
}
<span style=”text-decoration: underline;”>Important note: This method only hides the visual element. The related products data is still loaded in the background.</span>
3. Using Code Snippets:
- Add to functions.php: Add the following code snippet to your theme’s functions.php file (or preferably a child theme’s functions.php )remove_action( ‘woocommerce_after_single_product_summary’, ‘woocommerce_output_related_products’, 20 );
Instead of showing random related products, add a slick “Frequently Bought Together” section.
It’s like suggesting fries with a burger – customers love the combo, and it bumps up your average order value (AOV) effortlessly.
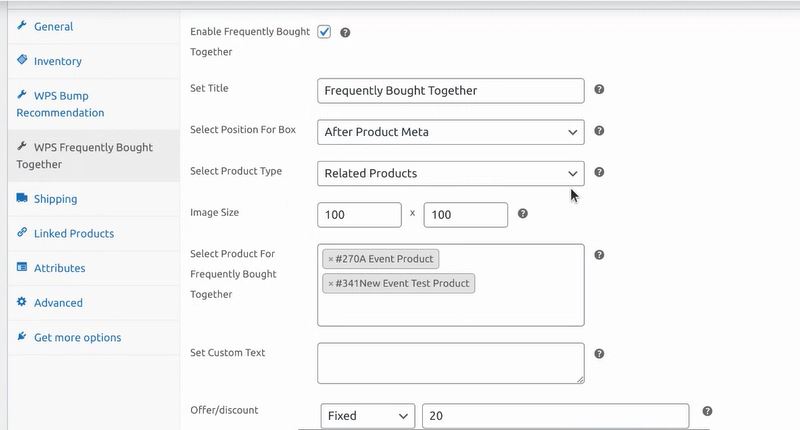
Pro Tips for Maximum Impact
- Keep It Relevant: Pair products that make sense together (e.g., coffee beans with a coffee maker).
- Offer Discounts: A small fixed or percentage discount can seal the deal.
- Use Shortcodes: Use [wps_bump_offer_shortcode] to place the feature anywhere on your site for extra flexibility.
- Track Performance: Use the plugin’s analytics to see which combos are clicking with customers.
-
AuthorPosts
