Forum Replies Created
-
AuthorPosts
-
 ChristopherParticipant
A Funnel builder in WordPress helps you create a step-by-step sales process, guiding visitors from landing on your site to making a purchase (and even grabbing an upsell or two).
Instead of just listing products, a sales funnel optimizes the journey to increase conversions and revenue.
If you’re using WooCommerce, the One Click Upsell Funnel plugin by WP Swings makes it super easy to build one.
Here’s how:
- 1️⃣ Install & Activate the plugin from your WordPress dashboard.
- 2️⃣ Create a new funnel in WP Swings → One Click Upsell Funnel Plugin.
- 3️⃣ Add upsell/downsell offers after checkout to boost AOV.
- 4️⃣ Customize pages using Elementor, Divi, or Gutenberg.
- 5️⃣ Set triggers & launch—test it and start selling smarter!
The best part? Customers can accept upsells with just one click (no re-entering payment details). 🚀 Perfect for increasing sales without annoying buyers.
Please leave a comment on what worked best for you. 👇
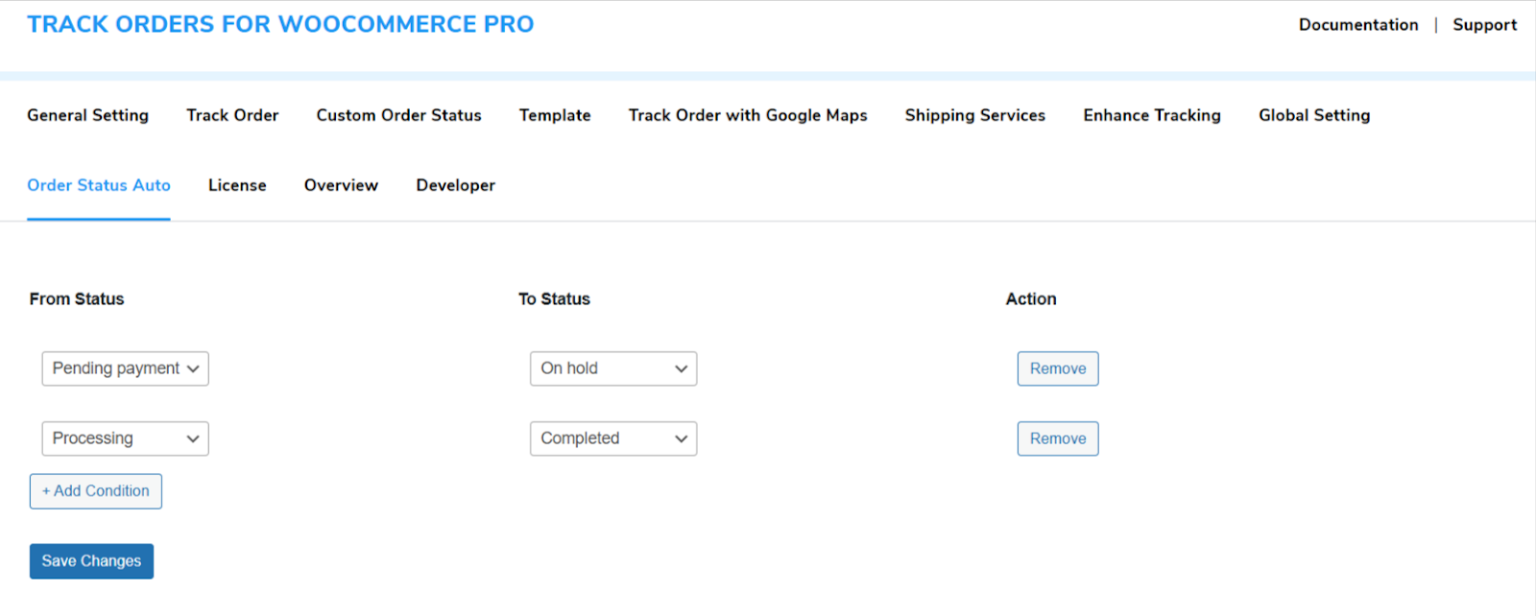
February 13, 2025 at 10:57 am in reply to: Auto-Update Order Status in Track Orders for WooCommerce #3791ChristopherParticipantThe Auto-Update Order Status in the order tracker plugin feature automatically updates the order status in WooCommerce.
The Auto-Update Order Status feature works based on certain plugin conditions:-
Navigate to the plugin settings and open the Auto Update Order Status tab.
Add a new condition by specifying:
- Initial Status: The current order status that triggers the automation (e.g., “Processing”).
- Target Status: The status to which the order will transition (e.g., “Completed”).
Save and Activate
The system will then monitor orders and transition their statuses 2 minutes after entering the specified initial status.
This simplifies WooCommerce order management by automatically updating statuses after a specified delay.
 ChristopherParticipant
To set related products in WooCommerce using the Upsell Order Bump Plugin by WP Swings, you can follow these steps:
Installation of the Plugin
1. Install the Free Version:
– Go to your WordPress dashboard.
– Navigate to Plugins > Add New.
– Search for “Upsell Order Bump Offer for WooCommerce” and click “Install Now”.2. Install the Premium Version** (if applicable):
– Download the premium plugin from your WP Swings account.
– In your WordPress dashboard, go to Plugins > Add New > Upload Plugin.
– Choose the downloaded .zip file and click “Install Now”.
– Activate the plugin after installation.Creating Related Products (Order Bumps)
1. Access Order Bump Settings:
– Navigate to the Upsell Order Bump section in your WordPress dashboard.2. Create a New Order Bump:
– Click on the “Create New Bump” button.
– Fill in details such as the Name of the Order Bump and priority, and set a Minimum Cart Value if needed.3. Select Target Products:
– In the “Select Target Products” section, specify which products should trigger this order bump when added to the cart. You can select individual products or entire categories.4. Configure Offer Settings:
– Choose an offered product that will be displayed as an upsell when customers add a qualifying product to their cart.
– Set pricing options for the offer, including discounts or fixed prices.5. Customize Appearance:
– Select templates and customize the design of your order bump offer to match your store’s branding.6. Set Global Settings:
– In the Global Settings section, enable or disable various functionalities like enabling upsell order bumps across all products or setting specific locations on the checkout page where these offers will appear.7. Save Changes:
– After configuring all settings, make sure to save your changes to activate the order bump offer.Utilizing Smart Features
– Smart Skip: This feature allows you to skip showing the offer if the customer has already purchased that product.
– Countdown Timers: Use countdown timers to create urgency around your offers, encouraging quicker purchases.
– AB Testing: Test different order bump offers to see which ones convert better and adjust accordingly based on performance analytics.
By following these steps, you can effectively set up related products in WooCommerce using the WooCommerce Upsell Plugin, enhancing customer experience and potentially increasing sales through targeted offers at checkout.
ChristopherParticipantYes, using the Upsell Order Bump Plugin for WooCommerce, you can customize cross-sell products and their offers effectively.
Here’s how:
1. Template Selection:
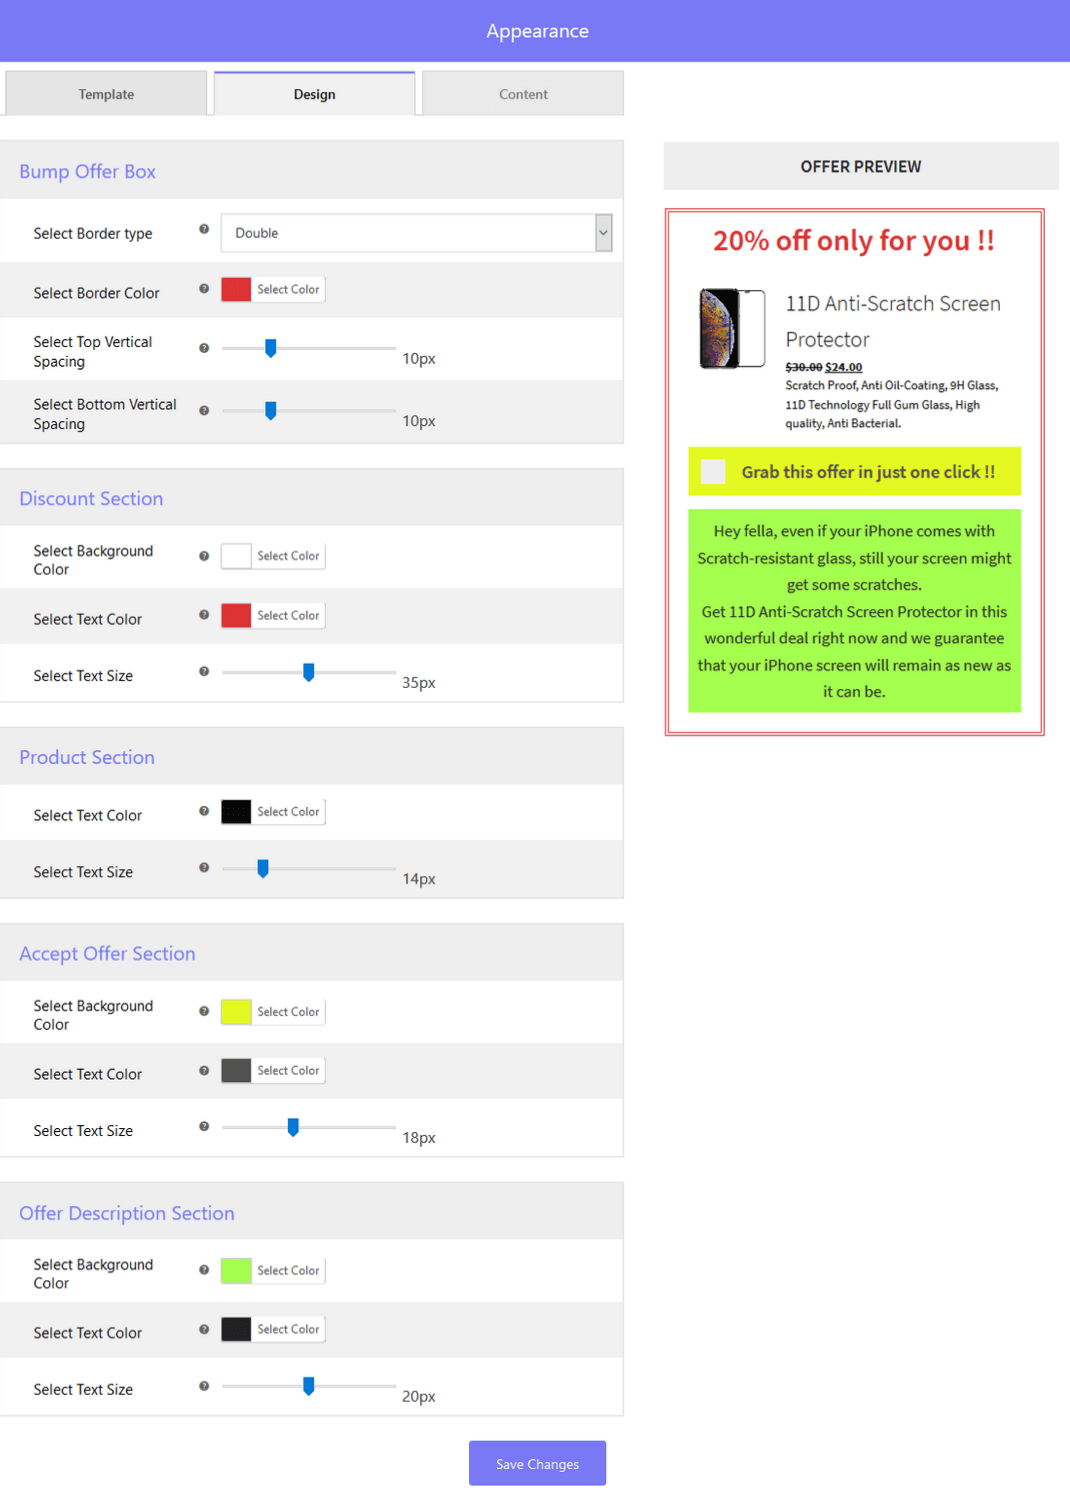
You can choose from three default offer templates in the free version or access 10+ templates if you’re using the premium version. These templates provide a foundation for setting up your cross-sell offers.2. Design Customization:
The plugin allows you to fully customize the design of the cross-sell offers. You can adjust the:
– Bump Offer Box
– Discount Section
– Product Section
– Accept Offer Section
– Offer Description SectionReal-time previews ensure you can see the changes instantly.
3. Content Updates:
You can modify the content of the cross-sell offers to align with your sales goals. Editable fields include:
– Discount Title
– Product Description
– Lead Title
– Offer Description4. Activation and Display:
Once the customization is complete, enable the offer with a toggle button and save the changes.The cross-sell offers will then be live and visible on the cart page, seamlessly integrated into the customer journey.
This makes the plugin highly flexible and user-friendly for tailoring cross-sell products and offers to boost your sales.
January 6, 2025 at 5:23 am in reply to: Carriers supported with WooCommerce shipment tracking. #3644ChristopherParticipantWith the Track Orders Plugin, there are many shipment carriers you can integrate with. Some of them are UPS, FedEx, DHL, USPS, Canada Post, and more.
You can configure the plugin with the specific carriers you use to provide accurate WooCommerce shipment tracking for your customers.
The Track Orders for WooCommerce plugin also provides automatic updates for tracking statuses, sending customers real-time updates about their shipments. This increases customer satisfaction and helps reduce support inquiries related to shipment tracking.
By offering support for a broad range of carriers, the Track Orders for WooCommerce plugin ensures that your store can accommodate international and local shipping needs, providing an enhanced WooCommerce shipment tracking experience for your customers.
For More Information, you can check the Track Orders for WooCommerce Plugin Documentation.
 November 14, 2024 at 10:37 am in reply to: How does one click upsell work and what are its keypoints ? #3525ChristopherParticipant
A one-click upsell for woocommerce is a strategic sales technique used in e-commerce to increase the average order value (AOV) by presenting customers with additional products or upgrades immediately after they complete their initial purchase.
This method allows customers to add these offers to their cart with just a single click, without needing to re-enter payment or shipping information, which enhances the buying experience and encourages impulse purchases.
Key Features of One-Click Upsell
- Post-Purchase Presentation: The upsell offer is displayed right after the customer has completed their primary transaction, capitalizing on their buying momentum and trust in the brand.
- Single-Click Convenience: Customers can accept the upsell with one click, making it a seamless addition to their order without additional hassle, which significantly reduces friction in the purchasing process.
- Increased Revenue Potential: By encouraging customers to spend more immediately after their initial purchase, one-click upsells can boost overall revenue. Studies have shown that implementing this strategy can increase sales by up to 30%.
- Enhanced Customer Experience: The convenience of adding relevant products post-purchase not only improves customer satisfaction but also increases the likelihood of repeat business.
Best Practices
- A/B Testing: Test different upsell offers and layouts to determine which combinations yield the highest conversion rates. This data-driven approach helps refine your strategy over time.
- Psychological Pricing Techniques: Use pricing strategies that encourage acceptance of upsells, such as showing a higher-priced item alongside lower-priced options to create perceived value.
- Limit Offers: Avoid overwhelming customers with too many upsell options at once; focus on one or two highly relevant offers for maximum impact.
ChristopherParticipantWordPress offers several options for creating sales funnels for free through various plugins.
Here are some notable free funnel builders available for WordPress:
- One Click Upsell Funnel (Free WordPress Funnel Builder) plugin allows merchants to create post-purchase upsell and cross-sell offers seamlessly integrated into WooCommerce checkout and thank you pages. This tool is designed to maximize sales and boost the average order value (AOV) by enabling customers to add upsell products with just one click, without needing to re-enter payment details.
- ClickFunnels ( Paid Version ) is a comprehensive software-as-a-service (SaaS) platform designed to help businesses create effective sales funnels that convert leads into customers. Launched in 2014, it provides a range of tools for building landing pages, managing customer relationships, and automating marketing processes.
There are other plugins too that offer paid versions of WordPress Funnel Builder like FunnelKit, WPFunnels, and more.
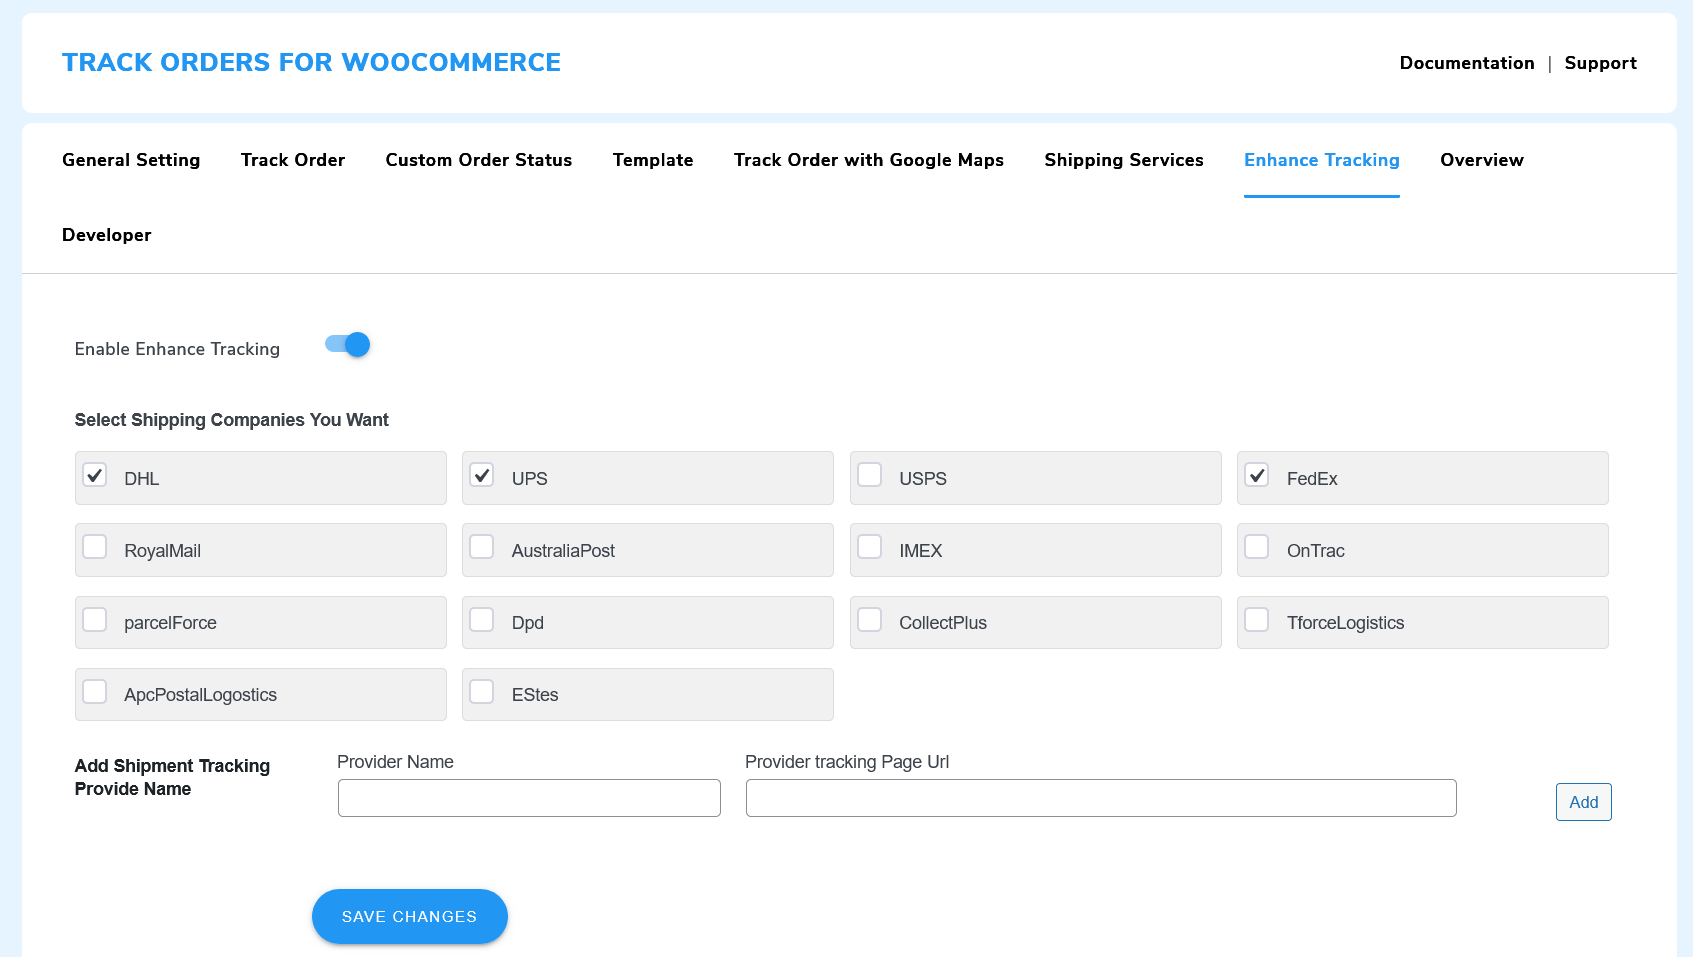
ChristopherParticipantTo add UPS Shipping to WooCommerce with the Track Orders for WooCommerce plugin, follow these steps:
- Enable Enhanced Tracking: Navigate to the Enhance Tracking tab in the plugin settings and click the toggle button to enable advanced tracking options.
- Select Shipping Companies: Choose from available shipping companies like DHL, USPS, UPS, IMEX, InTrac, and more by selecting their checkboxes.
- Add a New Shipment Tracking Company: If your preferred shipping company isn’t listed, you can add it manually. Enter the name of the shipping company and their tracking page URL, then click the Add button.
- Save Changes: After configuring your tracking options, make sure to save your changes.
This allows you to provide multiple tracking options for your customers, including detailed UPS tracking, directly from their account pages or via email notifications. For Detailed Configuration check out the Documentation – here
ChristopherParticipantTo build upsell funnels with Elementor using the One Click Upsell Funnel for WooCommerce plugin, start by creating a new funnel in the plugin’s dashboard as follows:-
Creating a New Funnel:-
- Access the plugin’s dashboard and create a new funnel.
- Select Elementor as your page builder for designing funnel pages like landing pages or upsell pages.
- This allows you to leverage Elementor’s drag-and-drop functionality for full customization.
- Fill in the required details for your funnel, such as name, target products, schedule, etc.
- Add an offer to your funnel by selecting the offer product, setting the price/discount, choosing an image, and specifying the redirection pages for “Buy Now” and “No Thanks” actions.
- Choose a predefined offer template that suits your needs or create a custom offer page.
Designing Custom Offer Pages
- Design your custom offer page using Elementor
- Insert the relevant shortcodes provided by the plugin to dynamically display the upsell offer details on your page.
- Copy the URL of your custom offer page.
- In the funnel settings, paste this URL into the Offer Custom Page Link field.
- Save the funnel changes.
Finalizing the Funnel
- Enable the sandbox mode to test your funnel.
- Deactivate the sandbox mode and save the funnel to make it live.
By following these steps, you can create visually appealing and highly customized upsell funnels using Elementor and the One Click Upsell Funnel plugin.
ChristopherParticipantTo add FedEx shipping to WooCommerce store using the Track Orders for WooCommerce plugin, follow these steps:
Step 1: Install the Plugin
Download the Plugin: If you haven’t already, download the Track Orders for WooCommerce plugin from the WordPress plugin repository or from your account on the WP Swings website.Install the Plugin: Go to your WordPress dashboard.
– Navigate to Plugins > Add New.
– Click on Upload Plugin, select the downloaded ZIP file, and click Install Now.
– Activate the plugin after installation.Step 2: Enable FedEx Shipment Tracking
Access Plugin Settings:
– Go to WooCommerce > Settings in your WordPress dashboard.
– Click on the Track Your Order tab.Enable Third-Party Tracking API:
– Toggle the option to enable third-party tracking.
Enable FedEx Shipment Tracking:
– Find the option to enable FedEx shipment tracking and toggle it on.
Enter FedEx Credentials:
– FedEx User Key: Provide your FedEx User Key, which you can obtain from your FedEx developer account.
– FedEx User Password: Fill in your FedEx developer account password.
– FedEx Account Number: Enter your unique FedEx account number.
– FedEx Meter Number: This number is necessary for shipping rate calculations and should also be provided.Step 3: Save
– Save Settings: After entering all the necessary information, ensure you save the settings to apply the changes.
ChristopherParticipantTo effectively track customer orders on your WooCommerce site, you can use the [woocommerce_order_tracking] shortcode.
This shortcode generates a form where customers can enter their order ID and billing email to view the status of their order. This functionality can be easily added to any page on your site, providing a seamless tracking experience for your customers.
To use the WooCommerce Order Tracking Shortcode, follow these steps
- Create a New Page,
- Go to your WordPress dashboard,
- Navigate to Pages > Add New,
- Create a new page and give it a title like “Order Tracking”,
- Add the Shortcode,
- In the content area of the page, paste the [woocommerce_order_tracking] shortcode,
- Publish the Page.
This will create a form on that page where customers can enter their order details (like the order number and billing email) to track their order status.
If you’re using a track orders plugin or an extension for enhanced tracking with Real Time Courier Updates, Real-Time Shipping Rates, or Estimated Delivery Dates, API Integration with Courier Services, (like Track Orders for WooCommerce Pro), you may need to use a different shortcode or customize the functionality further.
ChristopherParticipantAs per WooCommerce Docs,
The default priority for hooks is 10, but you can specify a different number to control the order in which hooks are executed .
In WooCommerce, hooks can be prioritized using a third parameter in the add_action() and add_filter() functions.
For example, if you want to ensure that your function is executed before all other functions attached to the woocommerce_before_cart_table hook, you could use a priority of 1
Code: add_action( ‘woocommerce_before_cart_table’, ‘my_function’, 1 );
Setting a lower priority number (like 1) will make the hook run earlier, while a higher number (like 20) will make it run later.WooCommerce also has a specific order in which hooks are executed by default, so it’s important to be aware of that when prioritizing your own hooks.
For example, some hooks are executed before the page header is loaded, while others are executed after the page footer is loaded.By understanding how to prioritize hooks, you can control the order in which your custom functions are executed relative to other hooks in WooCommerce.
This allows you to modify the behavior of WooCommerce at specific points in the page load process.
For More Detailed Overview you can WooCommerce Hooks Resources from this Blog.
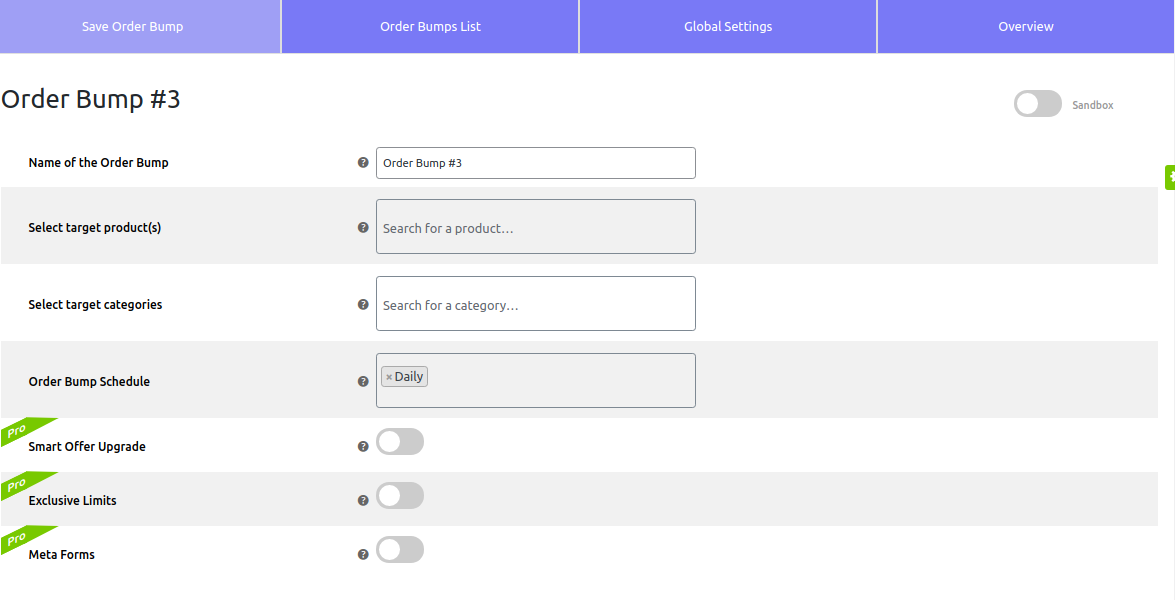
July 12, 2024 at 10:52 am in reply to: Can I Schedule Order Bump Offers To Appear Only on Specific Days? #3073ChristopherParticipantYes Zain, you can schedule order bump offers to appear only on specific days using the Upsell Order Bump Offer for WooCommerce Pro plugin.
This feature allows you to set up smart offer scheduling, enabling you to display order bumps on selected weekdays or daily, which can help in making the offers more effective and timely
To set up a schedule for order bump offers using the Upsell Order Bump Offer for WooCommerce Pro plugin,
Follow these steps:
Navigate to the Order Bump List Section: Go to your WordPress dashboard > Order Bump and click on the Order Bump List section.
Create a New Order Bump: Click on the “Create New Order Bump” button in this section.
Name your bump offer, select the target product, and target category, and schedule your offer for specific days accordingly.Set the Schedule: In the scheduling section, you can set the order bump to appear on specific days or daily. This feature allows you to schedule your bump offers to align with your business needs, such as for weekdays, weekends, or all days of the week.
Customize the Offer: Add your offer product and discount.
Select the offer template and customize the design and content as you want.
Make the funnel live and save changes.By following these steps, you can schedule your order bump offers to appear at specific times, helping you optimize your sales and conversions effectively.
June 28, 2024 at 11:01 am in reply to: Are There Any Restrictions for Guest Users Using Wallet Payments? #3012ChristopherParticipantThe WooCommerce Return Refund and Exchange Pro plugin does have some restrictions for guest users when it comes to using the wallet payment feature:
1. Guest User Restriction for Wallet Payment Method:
– The plugin allows merchants to restrict guest users from using the wallet payment method during checkout.
– This setting can be enabled/disabled by the store admin in the plugin settings.2. Guest User Restriction for Refunds:
– Similarly, the plugin also allows merchants to restrict guest users from requesting refunds.
– This ensures that only registered customers with a wallet can initiate refund requests.As the wallet feature itself is not available to guest users by default. However, the plugin provides a “Guest Feature via Phone Number” setting that enables guest users to access certain wallet functionalities.
When this setting is enabled, guest users can:
– Request refunds, exchanges and make payments using their phone number instead of an email address.
– Leverage their wallet balance to make payments during checkout.So in short, while the wallet is primarily designed for registered customers, the plugin allows merchants to optionally extend limited wallet access to guest users as well, such as using the wallet for payments.
June 7, 2024 at 12:26 pm in reply to: What Is the Purpose of the Order Message Tab in the RMA Plugin for Woocommerce? #2948ChristopherParticipantThe “Order Message” tab in the RMA Return Refund & Exchange for WooCommerce Pro plugin is designed to facilitate direct communication between customers and merchants regarding return, refund, or exchange requests. This feature is crucial for resolving issues quickly and effectively, ensuring a smooth customer experience.
Purpose and Functionality:
Direct Communication: The “Order Message” tab allows customers and administrators to exchange messages directly related to a specific order. This is particularly useful for clarifying issues, providing additional information, and ensuring both parties are on the same page.Attachments: The plugin provides an option to enable attachments, allowing customers to upload images or documents that can help in processing their return or refund request more efficiently.
Block Email Notifications: Administrators have the option to block email notifications for exchange-related messages, which can be useful if they prefer to handle communications directly through the website interface.
Customizable Button Text: The button text for sending messages can be customized to fit the branding and user interface of the store.
Setting Up the Order Message Tab:
Enable Order Messages:Navigate to the WooCommerce settings in your WordPress dashboard.
Go to WooCommerce > Settings > Return, Refund, and Exchange > Order Messages.
Enable the order message feature to activate the messaging system.Enable Attachments:
Toggle the setting to allow customers to attach image files to their messages. This can be found in the same “Order Messages” tab.
This feature helps in cases where visual evidence is needed to process the return or refund.Block Email Notifications:
Enable the setting to block exchange-related email notifications if you prefer all communications to be handled through the website.
Customize Order Message Button Text:
Use the provided setting to enter your preferred text for the order message button. This ensures the button matches your store’s branding and provides clear instructions to customers.
Email Configuration:
There is a link on the settings page to configure email notifications related to order messages. Click on this link to customize how and when emails are sent regarding order messages.
-
AuthorPosts