Forum Replies Created
-
AuthorPosts
-
March 24, 2025 at 7:15 am in reply to: How to use and show the evergreen timer in Upsell Popup ? #3909
 ZainParticipant
How to Use and Show the Evergreen Timer in an Upsell Popup?
1. Install and Activate the Plugin:- Begin by installing the Upsell Order Bump Offer for WooCommerce Pro plugin from WP Swings. Once activated, you’ll gain access to its full suite of features, including the Evergreen timer option.2. Create or Edit an Offer:- Navigate to your WooCommerce dashboard and go to the plugin’s section (typically found under WP Swings → Upsell Order Bump Offers).
Here, you can create a new upsell popup or edit an existing offer.3. Enable the Evergreen Timer:- In the offer settings, look for the timer options. You’ll find an option to enable the Evergreen timer—a feature designed to always show a fresh countdown for each visitor, enhancing urgency.
4. Simply toggle this option to activate it.
Note:- It only starts when any user comes to the checkout page. Here checkout means whatever location is set up done from the admin end
ZainParticipantYes, pop-up opt-ins will work on a WordPress WooCommerce eCommerce page using the Upsell Order Bump Plugin.
The plugin provides several features that allow you to trigger pop-ups under specific conditions, particularly for upselling at checkout.
How Pop-Ups Work with the Upsell Order Bump Plugin-
1. Exit-Intent Pop-Up (Premium Feature): If enabled, this feature displays a sales pop-up showing the WooCommerce upsell product image when a customer is about to leave your website.
2. Bump Offer Appearance (Premium Feature): You can choose whether to show the product title or image with or without a pop-up on the WooCommerce checkout page.
The upsell pop-up offers two options:
Open the product page within a pop-up (same frame).
1. Open the product page in a new tab.
2. Select Target BumpsThis feature allows admins to control which bump offers should appear in pop-ups.
Bump offers that are not selected will be displayed without pop-ups.Conclusion
Yes, the Upsell Order Bump Plugin supports triggering pop-ups based on user key events like purchase, including exit intent and targeted bump offers at checkout.By configuring these settings, you can ensure that relevant pop-ups appear to customers at the right time, increasing the chances of upsells and boosting conversions.
ZainParticipantRelated Products” section is a common feature that displays products that are related to the current product being viewed.
This section is typically found on single product pages and is designed to encourage customers to explore additional products that might interest them.
WooCommerce provides several hooks that allow you to customize the related products section.
To achieve this, you need to modify the query that fetches related products using the woocommerce_related_products hook.
WooCommerce stores the total number of sales for each product in a custom field called total_sales.
By sorting the related products query by this field, you can display the most popular products first.
To sort related products by popularity, you need to:
- Set the orderby parameter to meta_value_num (to sort by a numeric meta field).
- Specify the meta_key as total_sales (the custom field that stores the total number of sales).
Then, also you need to edit the PHP code yourself which is not a recommended method.
Luckily you can sort these Upsell and Cross Sell Related Products without changing a line of code, just use the WooCommerce Upsell Plugin by WP Swings which has various features to sort the related products as per your need.
 ZainParticipant
If you want to show related products by category using the WooCommerce Upsell Order Bump Offer plugin, follow these steps:
1️⃣ Install & Activate the plugin from your WordPress dashboard.
2️⃣ Go to WooCommerce → Order Bump Offers and Add New Offer.
3️⃣ Under Select Target Products, choose the product(s) that will trigger the upsell offer.
4️⃣ Under Select Target Categories, pick multiple categories. If a customer buys any product from these categories, the order bump will be triggered.
5️⃣ Choose the upsell product you want to show as a related product. Set discounts or special pricing if needed.
6️⃣ Customize the offer title, description, and placement (e.g., checkout page).
7️⃣ Save & Test the setup by adding a product from the selected category to the cart and checking if the offer appears.
This way, you can upsell related products by category and boost conversions easily!
 ZainParticipant
Here’s how you can show related products using the cross-sell shortcode and customize bump offer placements with the Upsell Order Bump plugin:
- Displaying Related Products with the WooCommerce Cross-Sell Shortcode
To show related products (cross-sells), you can use the shortcode [wps_bump_offer_shortcode]. Here’s how to implement it:
Step 1: Identify the product(s) you want to link as cross-sells in your WooCommerce product settings under the “Linked Products” tab.
Step 2: Add the [wps_bump_offer_shortcode] shortcode to the desired location, such as a custom product tab, a widget area, or any other page layout where you want related products to appear.
Step 3: If the shortcode displays as plain text instead of showing cross-sell products, ensure that your theme or page builder supports WooCommerce shortcodes. For WPBakery users, use the “Raw HTML” block or shortcode-friendly widgets.
- Customizing the Placement of Bump Offers
With the Upsell Order Bump Offer plugin, you can easily customize where bump offers appear during checkout or across your website.
Here’s how: Default Locations in Checkout:
– You can select from the following pre-defined locations for bump offers:- Before Order Summary
- Before Payment Gateways
- After Payment Gateways
- Before Place Order Button
These settings can be customized directly in the plugin’s admin settings.
January 13, 2025 at 12:25 pm in reply to: How Can I Show Upsell Order Bump on Side Cart Slider of My Website ? #3667ZainParticipantTo change the Order Bump on the Side Cart Slider of your website using the WooCommerce Upsell Order Bump Offer for WooCommerce plugin, follow these steps:
Steps to Enable Order Bump with Side Cart Slider:
- Install and Activate the Plugin: Ensure you have installed and activated the Upsell Order Bump Offer for the WooCommerce plugin on your website.
- Navigate to WooCommerce > Settings > Order Bump.
- Under the General Settings, you’ll find the option to enable the Side Cart WooCommerce.
Check the box to enable side cart functionality.
Customize the Order Bump Offer:
- Go to Order Bump Offers > Add New Offer.
- While creating the order bump, make sure the product(s) selected as the bump offer align with the user’s cart conditions.
- Ensure the Side Cart Plugin Is Installed.
Confirm that the side cart displays dynamically when items are added to the cart.
Test the Functionality:Add products to the cart on your site and verify that the order bump offer appears on the side cart slider.
ZainParticipantYes, you can schedule funnels using the One Click Upsell Funnel for WooCommerce.
Both free and pro plugin allows you to create multiple sales funnels, including upsell offers, and it provides features that enable scheduling these funnels according to your marketing strategy.
You check in detail documentation on how to create and schedule woocommerce funnels.
Likewise, the free version of the plugin allows for unlimited funnel creation, while the Pro version offers additional features that may enhance your scheduling capabilities, such as advanced customization options and analytics.
November 5, 2024 at 4:21 am in reply to: Difference Between Woocommerce Flat Rate Shipping &Amp; Table Rate Shipping? #3486ZainParticipantWooCommerce flat rate shipping and table rate shipping are two distinct methods for calculating and managing shipping costs in an online store. Here are the key differences between them:
- Flat Rate Shipping:- – Definition: Charges a fixed shipping fee for each order or per item, regardless of weight, size, or destination.
– Simplicity: Easy to understand and set up; customers know exactly what they will pay for shipping at checkout
– Types: Per Order: A single flat fee for the entire order.
– Per Item: A fixed fee is applied to each item in the order.
– Customization: Limited customization options; can adjust based on shipping classes or quantities but generally remains straightforward.
– Use Cases: Ideal for businesses with similar product sizes and weights, or when aiming to simplify the customer experience. - Table Rate Shipping:-
– Definition: Charges vary based on multiple factors, allowing for more complex pricing structures.
– Complexity: More complicated to set up, as it involves defining multiple conditions (e.g., weight ranges, price ranges, destination zones).
– Customization: Highly customizable; can set different rates based on various criteria such as order total, weight, dimensions, and shipping destination.
– Use Cases: Suitable for businesses that sell a wide variety of products with different sizes and weights, requiring a more tailored approach to shipping costs.
In summary, flat-rate shipping offers a straightforward approach with fixed costs, while table-rate shipping provides flexibility and complexity tailored to diverse product offerings.
Table Rate Extensions for Shipping Solutions: Track Orders for WooCommerce Pro
ZainParticipantHmm, adding different shipping options in WooCommerce? That’s a good question, and I guess it can be a bit confusing at first.
But once you get the hang of it, it’s not too complicated.
You can actually customize it pretty easily to offer things like flat-rate shipping, free shipping, and local pickup.
Let me walk you through the steps:
Step 1: Set Up Shipping Zones
- Go to WooCommerce settings: In your WordPress dashboard, navigate to WooCommerce > Settings.
- Select the ‘Shipping’ tab: This is where you’ll configure the shipping settings.
- Add Shipping Zones: Click ‘Add Shipping Zone’.
- Name your zone, and select the regions (e.g., countries, states, or zip codes) that apply.
- Once you’ve defined the zone, click ‘Add Shipping Method‘.
Step 2: Add Shipping Methods
After setting up zones, you can add different shipping methods for each one.Flat Rate Shipping:
- Choose Flat Rate as a method.
- Click ‘Edit’ to set a fixed shipping price (e.g., $5 for all orders in a specific zone).
- You can also configure different prices for various shipping classes.
Free Shipping:
- Add Free Shipping and specify conditions (like “Free shipping for orders over $100”).
Local Pickup:
- Choose Local Pickup as a method for customers who prefer to pick up their orders.
Step 3: Add Shipping Classes (Optional)
If you need different shipping rates based on product type or size, you can set up Shipping Classes.- Go to WooCommerce > Settings > Shipping > Shipping Classes.
- Click Add Shipping Class and name it (e.g., “Large Items”).
- Assign different costs for each class when you’re configuring the shipping method in the zones.
- Step 4: Streamline Tracking with a Plugin
- Now, about tracking orders—this is where it can get easier with plugins like Track Orders for WooCommerce.
Here’s how it helps:
- Customer Order Tracking: Users can enter their order number and email to track their shipment, reducing customer support requests.
- Real-Time Updates: Both you and the customers can track orders in real-time via a user-friendly dashboard.
- Seamless Integration: The plugin works directly with WooCommerce, so no complex setup is needed.
By configuring these shipping options and using an order tracking plugin, you’ll not only give customers more flexibility but also streamline your order management process.
ZainParticipantHmm, creating a free funnel? That’s a good question, and it can be a bit tricky when you’re looking for something that doesn’t have a price tag. There are a few solid options out there for building a free sales funnel.
You can create a free sales funnel using several platforms that offer user-friendly tools and features without any upfront costs. Here are some popular options:
- Systeme.io: This all-in-one marketing platform allows you to create sales funnels, landing pages, and email campaigns for free. It provides various templates and an easy drag-and-drop builder.
- Mailchimp: While primarily an email marketing tool, Mailchimp allows you to create simple landing pages that can function as sales funnels. You can set up automated email sequences to nurture leads for free, depending on your subscriber count.
- One Click Upsell Funnel for WooCommerce: If you’re using WooCommerce for your online store, you can create sales funnels for free using this plugin. It enables you to set up upsell and downsell offers seamlessly after customer purchases.
By leveraging the One Click Upsell Funnel for WooCommerce plugin, you can effectively create and manage sales funnels at no cost, making it an excellent option for marketing your products or services efficiently.
Creating a New Funnel
- To create a funnel: Go to the Funnel List section and click on Create New Funnel.
- Fill in details such as Funnel Name
- Set Minimum or Maximum Cart Amount
- Target Product(s)
- Schedule Funnels
- Add offers to the funnel by clicking on Add New Offer, specifying product details, pricing, and redirect pages.
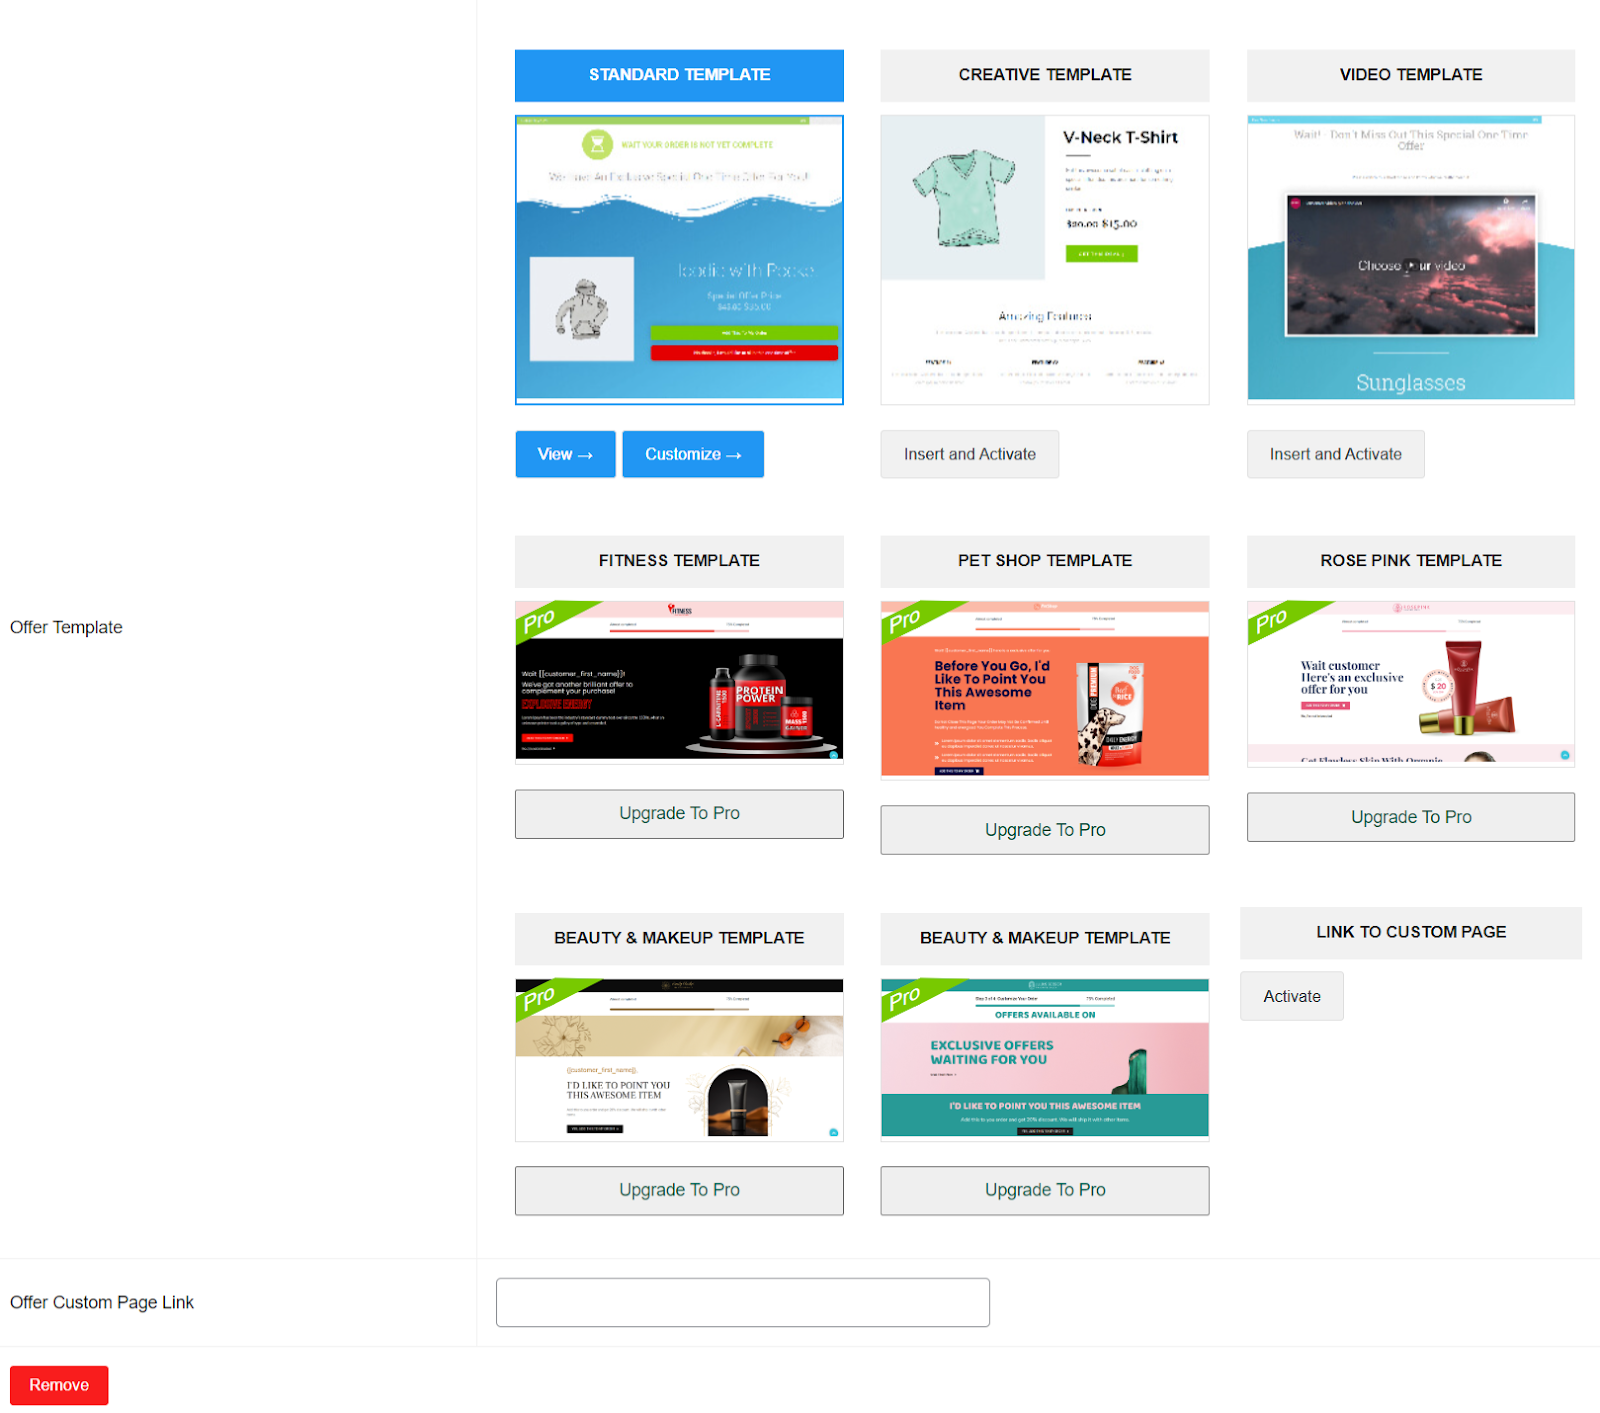
September 12, 2024 at 12:26 pm in reply to: Can I Import Sales Funnel Templates From Elementor and Use on One Click Upsell ? #3347ZainParticipantCurrently, you cannot import sales funnel templates directly from Elementor to use in the One Click Upsell Funnel for WooCommerce plugin by WP Swings.
But the plugin itself provides pre-built templates, also these are customizable with Elementor.
However, you can create new and design custom upsell or downsell pages using Elementor page builder which also provides the feature of importing pre-built templates into the page and then linking those pages to your sales funnel within the One Click Upsell Funnel Builder plugin under the Funnel Creation Section > Offer Custom Page Link Box
 August 28, 2024 at 12:22 pm in reply to: Difference Between Exclusive Offer and Smart Skip if Already Purchased? #3268ZainParticipant
Yes, Christophe.
The distinction between Exclusive Offer and Smart Skip If Already Purchased lies in their functionality and application within an upsell funnel.
Exclusive Offer is a funnel feature designed to present a particular offer to customers only once during their interaction with the sales funnel.
This means that regardless of whether the customer accepts or declines the offer, they will not see it again in future interactions.
This approach is often used to create a sense of urgency and exclusivity, encouraging customers to make a decision on the spot.
Smart Skip If Already Purchased: On the other hand, Smart Skip If Already Purchased is a global feature that functions differently. This feature ensures that an offer is only shown to customers who have not previously purchased the product, either through a standard transaction or as part of an upsell.
If a customer has already bought the product, they will automatically skip the offer in future interactions.
In summary, while an Exclusive Offer focuses on limiting the frequency of an offer to create urgency, Smart Skip If Already Purchased aims to tailor the customer experience by avoiding the repetition of offers for products already purchased.
ZainParticipantHere is How You Can Set Woocommerce Additional Fees on Checkout
Adding fees to WooCommerce orders programmatically can enhance your store’s functionality, allowing for dynamic pricing adjustments based on various conditions.
Below I have explained how to achieve this, including necessary hooks, functions, and best practices.
1. Understanding the Basics
In WooCommerce, you can add fees to an order using the woocommerce_cart_calculate_fees action hook. This hook allows you to modify the cart’s total before it is processed for checkout.2. Code Snippet for Adding Fees
Here’s a basic example of how to add a fee programmatically:Code:
add_action(‘woocommerce_cart_calculate_fees’, ‘add_custom_fee’);
function add_custom_fee() {
// Check if the cart total meets a specific condition
if (WC()->cart->subtotal >= 100) { // Example condition: subtotal >= $100
$fee = 10; // Amount of the fee
WC()->cart->add_fee(__(‘Custom Fee’, ‘your-text-domain’), $fee);
}
}3. Explanation of the Code
- Hook: woocommerce_cart_calculate_fees is triggered when the cart is recalculated.
- Function: add_custom_fee() is a custom function where you define your fee logic.
- Condition: In this example, a fee of $10 is added if the cart subtotal is $100 or more.
- Adding the Fee: The add_fee() method is used to specify the fee’s name and amount.
4. Conditional Logic for Fees
You can customize the fee based on various conditions, such as:
User Roles: Check if the user is a specific role (e.g., ‘wholesale_customer’).
Product Types: Apply fees based on the types of products in the cart.
Order Totals: Set different fees for varying order totals.5. Considerations for Taxes and Notifications
Tax Settings: Ensure that your fees are set to be taxable or non-taxable based on your store’s tax settings. You can do this by adding a third parameter to the add_fee() method:Code:
WC()->cart->add_fee(__(‘Custom Fee’, ‘your-text-domain’), $fee, true); // true for taxable
6. Testing Your Implementation
After implementing your code, thoroughly test the following:Different Scenarios: Test various cart totals and user roles to ensure the fee is applied correctly.
Checkout Process: Verify that the fee appears correctly in the cart, checkout, and order confirmation emails.Adding fees to WooCommerce orders programmatically using WooCommerce Hooks is a powerful way to customize your e-commerce store.
By using the woocommerce_cart_calculate_fees hook and implementing conditional logic, you can create a tailored shopping experience for your customers.
Always remember to test your changes thoroughly to ensure a seamless checkout process. If you have any further questions or need assistance, feel free to ask our WooCommerce Expert Team
July 22, 2024 at 6:28 am in reply to: How Can I Track the Performance of My Upsell Funnels in Google Analytics? #3099ZainParticipantIf you have Enhanced Ecommerce tracking enabled in GA4(Google Analytics), you can access detailed reports on upsell performance,
By setting up these tracking mechanisms in Google Analytics, you can gain valuable insights into the effectiveness of your upsell funnels and make data-driven decisions to enhance your sales strategies.
To track the performance of your upsell funnels in Google Analytics, you can follow these steps:
1. Set Up Goals:
Define specific goals related to your upsell funnels. This can be done by creating unique upsell pages for each upsell offer.
For example, you can name your upsell pages like “Big-Offer-on-Holiday” to differentiate them. Then you can check on GA4 that how many users saw your Upsell Offer, their engagement rate, their page view time, bounce rate, and CTA Clicks.
2. Monitor Key Metrics
Track essential metrics related to your upsell funnels, including:Conversion Rate: The percentage of users who complete the upsell purchase after viewing the offer.
Average Order Value: The average amount spent by customers who accepted the upsell.
Revenue from Upsells: Total sales generated from upsell offers during a specific period.Thats how you can track One Click Upsell Offers performance in GA4 ( Google Analytics ).
July 5, 2024 at 12:50 pm in reply to: How do I add the “Track Your Order” popup to my WooCommerce store? #3045ZainParticipantTo add the “Track Your Order” popup to your WooCommerce store using the Track Orders for WooCommerce Pro plugin, follow these steps:
Enable the Track Your Order Popup:
- In the settings section > go to the “Track Order Setting” section.
- Enable the “Enable Track Your Order Popup” toggle.
- This will activate the “Track Your Order” functionality within a pop-up box for customers.
With this feature enabled, customers can conveniently monitor the progress and status of their orders by clicking on the “Track Order” button located in the Orders tab of the My Account section.
By enabling the Track Your Order Pop-up, you can improve transparency and enhance the overall customer experience for order fulfillment in your WooCommerce store.
-
AuthorPosts