Forum Replies Created
-
AuthorPosts
-
April 26, 2023 at 5:10 am in reply to: Can we Show the Stock Alert for Variations on a Single Page? #1825
 William JohnParticipant
With WooCommerce Variation Master setting gallery image is simple and easy that requires certain steps to be followed:
- First, you need to Go to the variable product edit page.
- Then navigate to variations and click on any variation.
- Add multiple images by clicking on – “Add Variation Gallery Images”
- ‘Save changes’ after adding images.
Once you save the changes, the image gallery will display on that product page.
April 18, 2023 at 1:07 pm in reply to: How to Restrict Coupons according to Product Categories with Gift Cards plugin? #1769 William JohnParticipant
You can select such product categories to restrict customers from buying products from those categories.
To do this, go to the Products tab of the Gift Card Plugin and enter the categories you want to exclude.
Then click Save Changes after adding the categories.
If you want, you can also exclude specific products and sale items with this setting.
April 11, 2023 at 1:46 pm in reply to: How can I raise a request for Money Withdrawal from my Wallet? #1696 William JohnParticipant
You can allow wallet users to recharge each others’ wallets in a short time using Wallet System for WooCommerce Pro Plugin. You simply have to go to your ‘Frontend’ of the Plugin.
On the Frontend Go to the ‘Wallet’ Tab
Under the ‘Wallet’ tab, go to ‘Generate QR code’.
From here users can generate the Wallet QR code and share it with other wallet users. From the QR code, they will be able to receive money from other users as well as recharge their wallets in a short time.
April 3, 2023 at 1:28 pm in reply to: How can I raise a request for Money Withdrawal from my Wallet? #1599 William JohnParticipant
Yes, you as a customer can withdraw your money from the wallet using Wallet System for WooCommerce plugin. You simply have to request the admin for the withdrawal of the wallet amount.
For this, you need to follow some simple steps as described below:
- First, log in to your store using your credentials.
- Then Go to the ‘My-account’ page
- Under the ‘My-account’ page Go to ‘Wallet’
- Then Go to ‘Wallet Withdrawal Request’.
- You need to enter your bank details for receiving your requested amount.
However, Admin has the authority to approve or disapprove your withdrawal request.
March 28, 2023 at 1:53 pm in reply to: What are some key factors when selecting a WordPress hosting provider? #1539 William JohnParticipant
What is the most important part of keeping WordPress Hosting Secure?
March 28, 2023 at 1:48 pm in reply to: Can I exclude any Product, Category, or User from the Variation Swatches view? #1537 William JohnParticipant
1. Go to Products > Attributes.
2. Create a new attribute, or skip this step if you already have one.
3. Edit the attribute by clicking edit or Configure Terms.
4. Add New Color or whatever your attribute is called (or choose to edit an existing term).
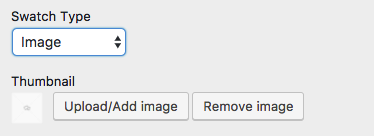
5. Select either “Color” or “Image” in the Swatch Type dropdown.
6. If you’ve chosen a color, you’ll be able to click on the color icon and select the color you want to use in the color picker.
7. If you’ve chosen an image, you’ll be able to upload the image.
8. Select ‘Add New Color’.
March 22, 2023 at 1:39 pm in reply to: How WooCommerce Variation Swatches can be used per product attribute? #1472 William JohnParticipant
First, you need to go inside the product setting of your WooCommerce store and then:-
- Go to the product edit page.
- Go to the variation Swatches setting.
- Go to the color (attribute) setting.
- Go to display type and select image/color from the dropdown.
- Set display name “yes”.
- Then go to variations (black, navy).
- Set enable “yes” from the dropdown.
- Set display type color/image according to your need.
- Then click on the update button.
Then you will see swatches per product attribute on the WooCommerce store. Visit the WooCommerce Variation Master plugin to check the functionalities in detail.
 William JohnParticipant
This section will show you how to skip the cart page using WooCommerce default settings.
Step 1: Redirect the cart page after successful addition
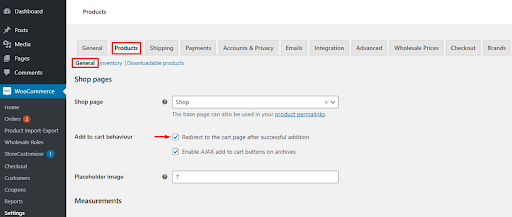
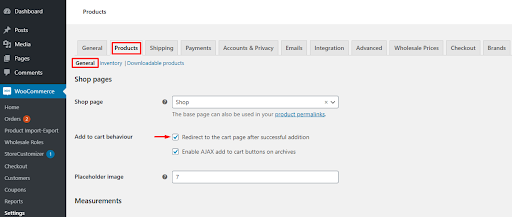
First off, you need to go to the WooCommerce dashboard and then navigate to WooCommerce > Product settings. After that, under the Products tab, you click on the General settings option. Then, under the Add to cart behavior settings, check the box Redirect to the cart page after successful addition and save the changes you’ve just made.

Step 2: Redirect the cart page link to the checkout page
Go to the Advanced tab and click on the Page Setup section. For the Cart page setting, you have to set Checkout as the default Cart page by simply choosing the option Checkout from the drop-down menu. Once done, you need to save changes.Step 3: Remove the cart page link from the menu
To remove the cart page link from the menu, you need to navigate to Appearance > Menu settings. Click the Cart option under the Menu Structure section, then click Remove.Step 4: Change the Add-to-Cart button text
To do that, you have to go to Appearance > Editor, and then click on the functions.php file. After that, you need to add the following code snippet in the Themes function file:add_filter( ‘woocommerce_product_single_add_to_cart_text’, ‘lw_cart_btn_text’ );
add_filter( ‘woocommerce_product_add_to_cart_text’, ‘lw_cart_btn_text’ );
//Changing Add to Cart text to Buy Now!
function lw_cart_btn_text() {
return __( ‘Buy Now!’, ‘woocommerce’ );
}In both the store and individual product pages, the Add to cart text will be replaced with Buy Now!
-
AuthorPosts